

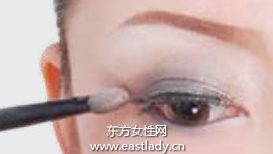
Step 1、描画清晰的黑色眼线。先用黑色眼线笔在上眼睑边缘描绘出一条明显的线条,再用海绵棒将线条晕染开来。
Step 2、用眼影粉晕染出层次。把眼影粉大幅刷在眼窝部位,双眼睑折叠线以内适当加深,然后用眼影刷向上晕染,逐渐浅淡,营造出层次效果。

Step 3、沿着下眼睑边缘画上细细的黑色眼线,眼尾处适当加粗,让眼影轮廓清晰,眼神更深邃。

Step 4、刷上加长加密的睫毛膏、用浓密加长型的睫毛膏增加睫毛的分量感,立刻展现眼妆华丽效果。

Step 5、使用带有珠光的亮粉沿下眼线描画,也可以提亮眉骨部位,增强立体感,效果更明显。